
Import Database in Plesk is an essential task when migrating a website or restoring a backup. Plesk provides a simple and user-friendly interface to manage databases, including the ability to import .sql files via phpMyAdmin. Whether you’re setting up a new site or moving data from a different server, this guide will walk you through the steps to efficiently import a database into Plesk.
To Import Database in Plesk, follow these steps:
Step 1: Log in to Plesk
- Access your Plesk control panel by logging in with your username and password.

Step 2: Navigate to Databases
- From the Websites & Domains tab, find your domain and scroll down to the Databases section.
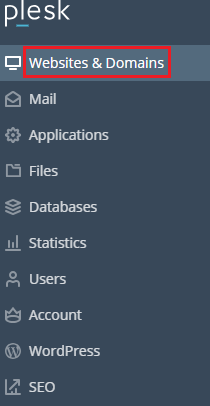
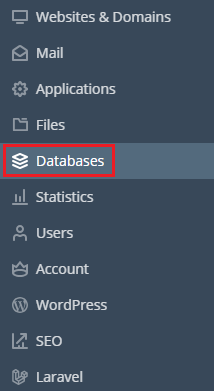
- Click ‘Databases’ in the left sidebar to access the necessary database management tools.
Step 3: Create a New Database (If Necessary)
- If you haven’t already created a database for your website, click on Add Database.
- Enter a name for the new database.
- Create a new database user and password, then click OK to save.

Step 4: Import the Database
- select the database you want to import.
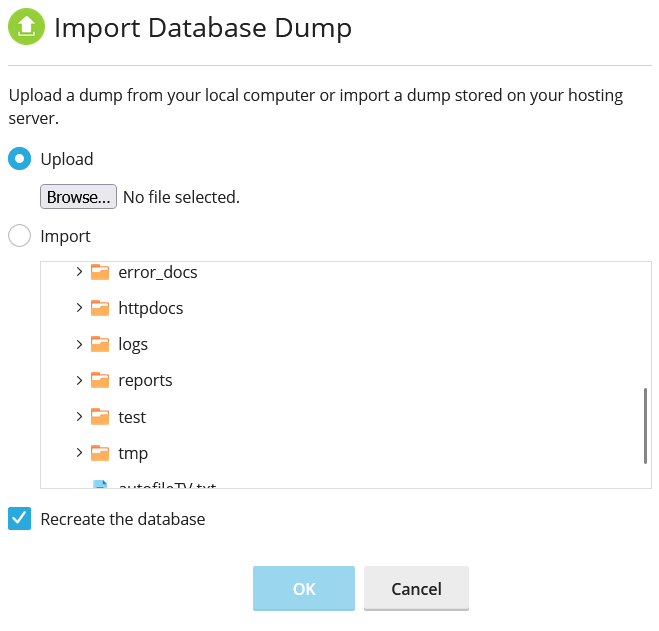
- Click on the Click on ‘Import Dump’

- In the File to Import section, click Browse and select the SQL file from your computer.
- The file should be in
.sqlformat, and if it’s compressed (e.g.,.zip,.gzip),
Step 6: Configure Import Options (Optional)
- For Import Database in Plesk, You can leave most settings as default, but if your SQL file has specific requirements (e.g., different character set or SQL compatibility mode), adjust them as necessary.
Step 7: Start the Import
- Scroll down and click OK to start the import process.

Step 8: Verify the Import
- Once the import is completed, you will see a success message.
- You can verify that the data was successfully imported by browsing through the tables in phpMyAdmin.
Step 9: Update Database Configuration (If Necessary)
- If you’re importing the database for a website, ensure that your website’s configuration file (such as
wp-config.phpfor WordPress) is updated with the correct database credentials (database name, user, password).
Troubleshooting Tips:
- File Size Limit: If the SQL file is too large, you might encounter an error while Import Database in Plesk. In this case, you can either increase the PHP upload limit through Plesk or use an SSH command line to import the database.
- Character Encoding: Ensure the character set of the import matches the database to avoid encoding issues.
Precautions Before Importing a Database in Plesk:
- Backup Existing Database:
- Before Import Database in Plesk, Always take a backup of the existing database before importing new data. This ensures you can restore it if anything goes wrong during the import process.
- Check File Format:
- Ensure that the file you’re importing is in
.sqlformat. If it’s compressed (e.g.,.zipor.gzip), phpMyAdmin will unzip it, but ensure it’s properly formatted to avoid errors.
- Ensure that the file you’re importing is in
- Match Database Versions:
- Verify that the version of the database you are importing is compatible with your current server’s database software (e.g., MySQL or MariaDB) to avoid compatibility issues.
- Character Encoding:
- Ensure the character set (e.g., UTF-8) of the database export matches that of the database you are Import Database in Plesk, to prevent encoding issues like garbled text.
- File Size Limits:
- Be aware of the maximum upload size limit in phpMyAdmin. Large files may not upload properly. If your database is large, consider splitting the SQL file or importing via SSH.
- Disable Plugins (for CMS):
- If you’re working with a CMS like WordPress or Joomla, consider disabling non-essential plugins before Import Database in Plesk to avoid compatibility issues during the import process.
- Verify Database Credentials:
- Ensure that your website’s configuration file (e.g.,
wp-config.phpfor WordPress) has the correct database credentials (name, user, password) to connect to the new database after import.
- Ensure that your website’s configuration file (e.g.,
- Check Table Prefixes:
- If you’re Import Database in Plesk into an existing database with tables, make sure there are no conflicts between table names (especially if you’re working with a CMS like WordPress that uses table prefixes).